In this tutorial we will show you how to create a full back up of your hosting account on Plesk and migrate it on a cPanel hosting.
Even the Plesk control panel provides a feature for automatic backup creation, very often this option is disabled by the hosting providers and only manual back up is possible. Furthermore, it can be restored only by the Plesk back up restore tool. Happily, you should not be worried because it is quite easy to create your own back up just in a few clicks using a standard FTP client and the admin panel of your Plesk account.
Usually the website consists of files and database(s). In this tutorial we will guide you how to create a back up both of them. For files backup we will use a normal FTP client and the databases will be exported via the phpMyAdmin tool available via the Plesk control panel.
Please click on the images in order to enlarge the screen shots for more detail.
Basic steps of creating a custom backup:
- Copying all files of your main website accessible via http://yourdomain.com.
- Copying all files of your websites accessible via your subdomains.
- Exporting all of your databases via the PHPMyAdmin
Copying your files on your local drive:
In order to copy your files on your local computer and create a custom backup of your files open your favorite FTP client and login under your account.
In the FTP host you should type your domain name or the FTP host provided by your WebHosting company. 99% of all cases your should not experience any difficulties using your domain name as FTP host.Then fill in your FTP username and password for your account.
As soon as you log in a similar content should be displayed on your scree:
Most probably on the left side you should see your local HDD content and on the right side your hosting account content. I will recommend you to create a local folder called backup for example, where you will download your hosting account content.
The content of your website that is directly accessible at http://yourdomain.com is located under the httpdocs directory. If you have any subdomains created (http://subdomain.yourdoman.com) you should copy the content of the subdomains folder as well.
So, first drag and drop the httpdocs folder from the right part to your back up directory on your local computer. Depending on your website size it might take some time to complete the process.
As soon as you have your httpdocs folder copied you may copy the whole subdomains directory as well or selectively copy your subdomains content one by one.Please note that if you have uploaded any data under your account out of your httpdocs and subdomains folders it will be good idea to copy it as well on your local HDD.
Export your databases:
Exporting your MySQL databases should not be a problem by following these basic steps below:
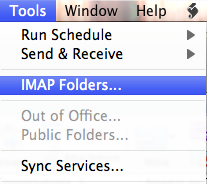
First access your Plesk control panel and login by using your Plesk username and password.
Be advised that your main FTP account username and password might be different from your Plesk control panel login credentials.
Wait for a second to have your page reloaded and click on your domain name from bottom of the page.
From the new page click on the Databases Icon from the service section
From the new page select your database from the list by clicking on its name.
This will take you to a new page from where you should click on the DB WebAdmin tool. A new window should be open for you from which you will need to click on your database name (on the top left corner).
In order to add an addon domain to your account you need an addon slot.
You will have to order as many addon slots as the number of addon domains you need to add.
You can order an addon slot from Customer’s Area -> Order Extras.
As soon as the page is reloaded and your database tables are displayed click on the Export thumb on the top. After having your page reloaded you will have several options available.

From this screen you should make sure that you have selected all of your database tables (see the screenshot). Additionally, it is recommended to tick the “add drop tables” option before having your database exported. If you need your database in any format different than SQL you can change it via the Export options under the tables list menu.
As soon as you have all the options applied select “Save As File” and click on the “Go” button on the bottom right corner. A question box will be displayed asking for the exact location where you would like to store your MySQL database dump. Select the appropriate location on your local HDD and click Save.
Please note that if you have more than one databases you should export all of the following the instructions above.
Restoring your website on your new cPanel hosting account:
In order to restore your website on your cPanel account you will need to upload your files and databases to your new host. You can easily upload your files by following our video tutorial at:
As soon as you have your httpdocs files and subdomains folders uploaded under your public_html directory you should import your databases. First, you will need to create a new database via your cPanel -> MySQL databases section following the instructions in our tutorial at:
When you have your databases created you should import your mysql dump which you have exported earlier via your cPanel -> phpMyAdmin. Please follow the instructions at:
When you have both your files and databases uploaded on your new host you should reconfigure your application to work with the new hosting enviropment. This can be done by editing your application configuration file. Most probably you will need to modify the mysql database name, username, password and hostname as well as the server path to your new document root for your domain name. The mysql database name, username and password are as you have set them during the creation process in your cPanel -> MySQL database. As for the database hostname — most probably it is localhost — still, you might always contact the support team of your host for the exact database hostname to which your application should connect.
The document root on cPanel hosting servers is usually: /home/your-cpanel-username/public_html/
I hope you will find this tutorial useful. If you experience any difficulties to create your back up just drop a comment and we will be glad to help you by adding further instructions in this tutorial. Be advised that TMDHosting Support team will perform the website transfer for you free of charge as a part of our hosting package. For more information you may check our
hosting plan features or contact our representatives via the live chat.