Saturday, April 25, 2015

0 Comments
Posted in Arrangement, Art, Business

How do I modify my hosts file?

Windows 8, Windows 7 and Windows Vista

Windows 8, Windows 7 and Windows Vista use User Account Control (UAC), so Notepad must be run as Administrator.
For Windows 8
  1. Press the Windows key.
  2. Type Notepad in the search field.
  3. In the search right click Notepad and select Run as administrator.
  4. In Notepad, open the following file:
    c:\Windows\System32\Drivers\etc\hosts
  5. Make the necessary changes to the hosts file.
  6. Click File -> Save to save your changes.
For Windows 7 and Windows Vista
  1. For Click Start -> All Programs -> Accessories.
  2. Right click Notepad and select Run as administrator.
  3. Click Continue on the "Windows needs your permission" UAC window.
  4. When Notepad opens Click File -> Open.
  5. In the filename field type:
    C:\Windows\System32\Drivers\etc\hosts
  6. Click Open.
  7. Make the necessary changes to the hosts file.
  8. Click File -> Save to save your changes.

Windows NT/2000/XP

  1. Click Start -> All Programs -> Accessories -> Notepad.
  2. Click File -> Open.
  3. In the filename field type:
    C:\Windows\System32\Drivers\etc\hosts
  4. Click Open.
  5. Make the necessary changes to the hosts file.
  6. Click File -> Save to save your changes.

Linux

1. Open a terminal window.
2. Open the hosts file in a text editor (you can substitute any text editor):
sudo nano /etc/hosts
3. Enter your password.
4. Make the necessary changes to the hosts file.
5. Press control-X (hold control and hit X), then answer y when asked if you want to save your changes.

Mac OS X 10.0 - 10.1.5

1. Open /Applications/Utilities/NetInfo Manager.
2. To allow editing the NetInfo database, click the padlock in the lower left corner of the window.
3. Enter your password and click OK.
4. In the second column of the browser view, select the node namedmachines. You will see entries for -DHCP-broadcasthost, and localhost in the third column.
5. Select the localhost item in the third column.
6. Choose Duplicate from the Edit menu (the quickest way to create a new entry is to duplicate an existing one). A confirmation alert appears.
7. Click Duplicate. A new entry called localhost copy appears, and its properties are shown below the browser view.
8. Double-click the value of the ip_address property and enter the IP address of the other computer.
9. Double-click the value of the name property and enter the hostname you want for the other computer.
10. Click the serves property and choose Delete from the Edit menu.
11. Choose Save from the File menu. A confirmation alert appears.
12. Click Update this copy.
13. Repeat steps 6 through 12 for each additional host entry you wish to add.
14. Choose Quit from the NetInfo Manager menu. You do not need to restart the computer. 

Mac OS X 10.6 - 10.1.8

1. Open Applications Utilities Terminal.
2. Open the hosts file by typing the following in the Terminal window:
sudo nano /private/etc/hosts
Type your user password when prompted.
3. Edit the hosts file. The hosts file contains some comments (lines starting with the # symbol), as well as some default hostname mappings (e.g. 127.0.0.1 – local host). Append your new mappings underneath the default mappings.
4. Save the hosts file by pressing Control+x and answering y.
5. Make your changes take effect by flushing the DNS cache with the following command:
dscacheutil -flushcache
6. New mappings should now take effect.

Tuesday, March 3, 2015

0 Comments
Posted in Arrangement, Art, Business

How to reinstall OS (Linux or Windows) on supermicro with IPMI?

Login to your IPMI (you should have IP address of IPMI and credentials). In order to do it open your favourite FireFox browser and go toHTTPS://YOUR_IPMI_IP/ , then accept all warnings and error messages for SSL certificate and add an exception for the IP. After login you should see following


Click on Remote console preview image to start iKVM java application (you should have Java VM 1.6 installed)


Click Virtual Media menu Item and select Virtual Media from drop down menu


if iKVM unable to connect and shows an error message, you need to reset it from maintenance tab of IPMI home page or even reset whole IPMI module (it could take up to 2 minutes and you will not be able to connect to IPMI during this time)


Go to CDROM&ISO tab


Select ISO file in Logical Drive type drop down


Press Open Image


Select your ISO with your OS installer and press open


Click Plug In


Now your ISO inserted to Virtual CDROM and we will need to boot from it.

3. Click On RESET button from main page of IPMI (see screen-short 1)

4. Go back to iKVM java application and periodically press F11 while server boots to display boot menu.

5. Select IPMI Virtual CDROM and press Enter.


6. Proceed with your favourite OS installation.

NOTE: Do not close java iKVM application while OS installation, it will “eject” your virtual CDROM.

Wednesday, February 18, 2015

0 Comments
Posted in Arrangement, Art, Business

Subscribe IMAP Email folders in Mac Mail

IMAP folders may need to be manually assigned to a Mac Mail account in order to synchronize properly. The following article explains how to find and configure this setting within the Mac Mail client.

How to Add Folders to the Subscription List in Mac Mail

  1. Open your Mac Mail client.
  2. In the top left corner, click on MAIL in the menu bar, then select PREFERENCES.
  3. Click on the Account Information button at the right of the screen.
  4. Make sure that the first item in the is checked off. It should read: Enable this account
  5. Next, click on the Advanced tab and click on the checkbox that reads Include when automatically checking for new messages
  6. Close the Accounts window, then under the MAILBOXES column on the lefthand side Control-click (or right-click) onto the INBOX icon.
  7. Click on GET ACCOUNT INFO. You will see an ACCOUNT INFO window pop up like the one in the screenshot on right. Click on SUBSCRIPTION LIST. You will see the list of folders that are subscribed or not subscribed for synchronization with your IMAP account. You can select the folder and SUBSCRIBE or UNSUBSCRIBE with the buttons at the bottom left of the screen.
  8. Close the ACCOUNT INFO window, then click on MAILBOX in the menu bar at the top of the screen.
  9. Click on Take All Accounts Offline. Wait for it to go off-line, then click on Take All Accounts Online to complete the changes.
If you are looking for information on setting up the Apple Mail Client, please go to How to Set up Mac Mail. Also, for further information on email in general, check out our Email Category page in the Support center.

Tuesday, December 23, 2014

0 Comments
Posted in Arrangement, Art, Business

How do I set my Mailman list to never hold anything for moderator approval?

There are four main places in Mailman configuration for a list that can cause incoming messages to be held for moderation.

Moderated members

List members who are set to "mod" (which stands for "moderated", not "moderator") will have their postings held. You can see who has the mod box checked by going into Membership Management, and if you want to set them all to be unmoderated, you can do that at the bottom of the page, with this setting:
  • Set everyone's moderation bit, including those members not currently visible. Select Off and then press the Set button.
To go with this, you may want to make sure that new members who are added to the list in the future are also unmoderated - you can do this under Privacy Options > Sender Filters. Change the setting for "By default, should new list member postings be moderated?", setting this to No.

Non-members

While members (under the default Mailman settings) are not moderated, non-member postings are by default moderated. If you want non-members to be able to post freely, you can change this setting here:
  1. Go to Privacy Options > Sender Filters
  2. Go to "Action to take for postings from non-members for which no explicit action is defined."
    The default here is "Hold", but if you change that to Accept then non-member postings will get through.

Large messages

There is a default maximum message size of 40K; messages beyond this maximum will be held for approval. You can turn off this limit by setting it to 0.
Go to General Options and set "Maximum length in kilobytes (KB) of a message body" to 0 for no limit.

Implicit destination / Too many recipients

Mail which is bcc'ed to the list (or is sent to another list which has your list as a member), or has a large number of recipients, will be held. When Mailman holds a message like this for moderator approval, the reason is "Message has implicit destination" or "Too many recipients to the message". To turn these off:
  1. Go to Privacy Options > Recipient Filters.
  2. Change the setting for "Must posts have list named in destination (to, cc) field (or be among the acceptable alias names, specified below)?" to No
  3. Change the setting for "Ceiling on acceptable number of recipients for a posting" to 0.

Sunday, November 9, 2014

0 Comments
Posted in Arrangement, Art, Business

How To: Install memcached on CentOS 6

Memcached is a distributed, high-performance, in-memory caching system that is primarily used to speed up sites that make heavy use of databases. It can however be used to store objects of any kind. Nearly every popular CMS has a plugin or module to take advantage of memcached, and many programming languages have a memcached library, including PHP, Perl, Ruby, and Python. Memcached runs in-memory and is thus quite speedy, since it does not need to write to disk. Here’s how to install it on CentOS 6:
Memcached does have some dependencies that need to be in place. Install libevent using yum:
yum install libevent libevent-devel
The memcached install itself starts with
To start installing memcached, change your working directory to /usr/local/src and download the latest memcached source:
cd /usr/local/src
wget http://memcached.googlecode.com/files/memcached-1.4.15.tar.gz
Uncompress the tarball you downloaded and change into the directory that is created:
tar xvzf memcached-1.4.15.tar.gz
cd memcached-1.4.15
Memcached is actively developed, so the version used in this tutorial may be out of date by the time you read this. As of this writing, 1.4.15 is the latest stable version. Check memcached.org for a newer version before proceeding with the installation.
Next, configure your Makefile. The simplest way is to run:
./configure
Additional configure flags are available and can improve performance if your server is capable. For 64-bit OSes, you can enable memcached to utilize a larger memory allocation than is possible with 32-bit OSes:
./configure --enable-64bit
If your server has multiple CPUs or uses multi-core CPUs, enable threading:
./configure --enable-threads
If your server supports it, you can use both flags:
./configure --enable-threads --enable-64bit
n.b.: if the configure script does not run, you may have to install compiling tools on your server. That is as simple as
yum install gcc
yum install make
Once the configure script completes, build and install memcached:
make && make install
Last but not least, start a memcached server:
memcached -d -u nobody -m 512 -p 11211 127.0.0.1
Put another way, the previous command can be laid out like this:
memcached -d -u [user] -m [memory size] -p [port] [listening IP]
Let’s go over what each switch does in the above command:
-d
Tell memcached to start up as a backgrounded daemon process
-u
Specify the user that you want to run memcached
-m
Set the memory that you want to be allocated my memcached
-p
The port on which memcached will listen.
And that’s it. Now go forth and speed up your sites!

Sunday, October 19, 2014

0 Comments
Posted in Arrangement, Art, Business

How to manage SSH keys in cPanel


0 Comments
Posted in Arrangement, Art, Business

REMOVING "INDEX.PHP " FROM A URL

Rewrite engines are little pieces of software that rewrite URLs for different pages within a website in order to make the URLs more "relevant-looking" and representative of content on particular pages. Joomla! features a rewrite engine, and sometimes this engine adds "index.php" to the URL. The result is a URL that may look something like the following: 

http://www.yoursite.com/index.php/category/article

A lot of clients would prefer that "index.php" be removed from the URL so it looks cleaner like the following:

http://www.yoursite.com/category/article

This article offers steps to remove the "index.php" from the URL. There are two parts to the process: a few settings made in the Administration area (the back end) of the site, and some changes to one of the sites s primary folders. The second part will require the use of file transfer protocol (FTP).

Global Configuration Settings in the Back End

Changes to the htaccess file Using FTP

Global Configuration Settings in the Back End

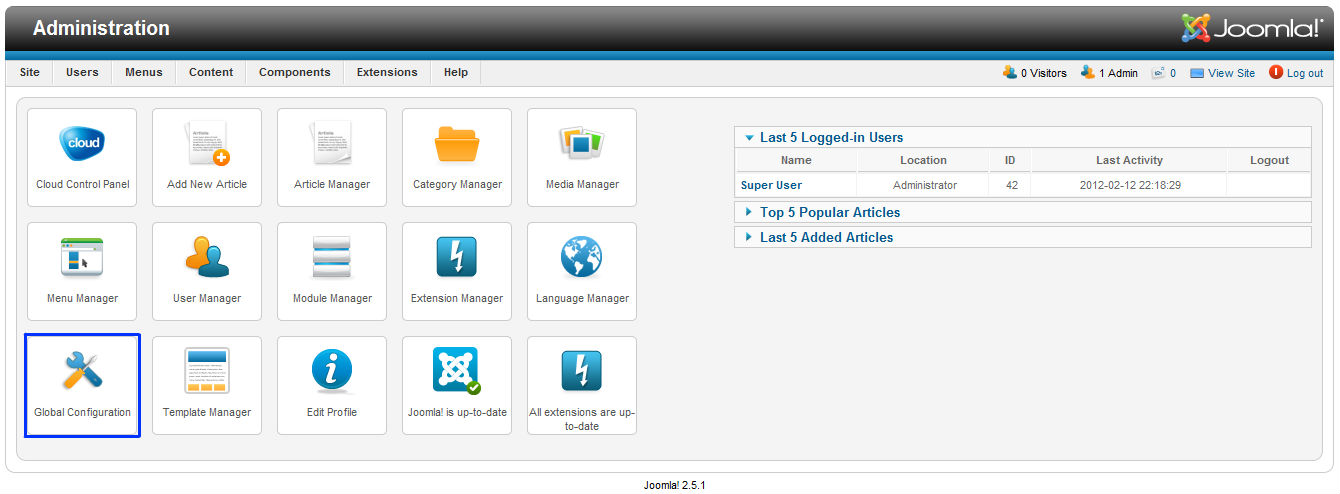
After logging into the back end of your site, go to Global Configurations.
index1
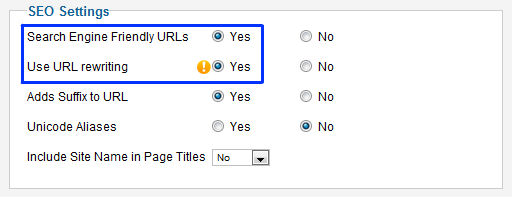
Under SEO Settings are, be sure that Search Engine Friendly URLs and Use URL rewriting are both set to "Yes".
index2
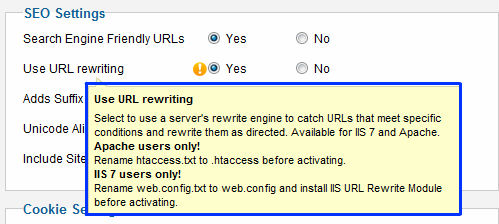
If you hover your mouse over the Use URL rewriting option, there is a text box that appears that will offer some additional guidance. As you follow steps in the next part of this article, it will be important to rename the "htaccess.txt" file to "htaccess" so the changes you make will be effective.
index2.5

Back to Top

Changes to the htaccess file Using FTP

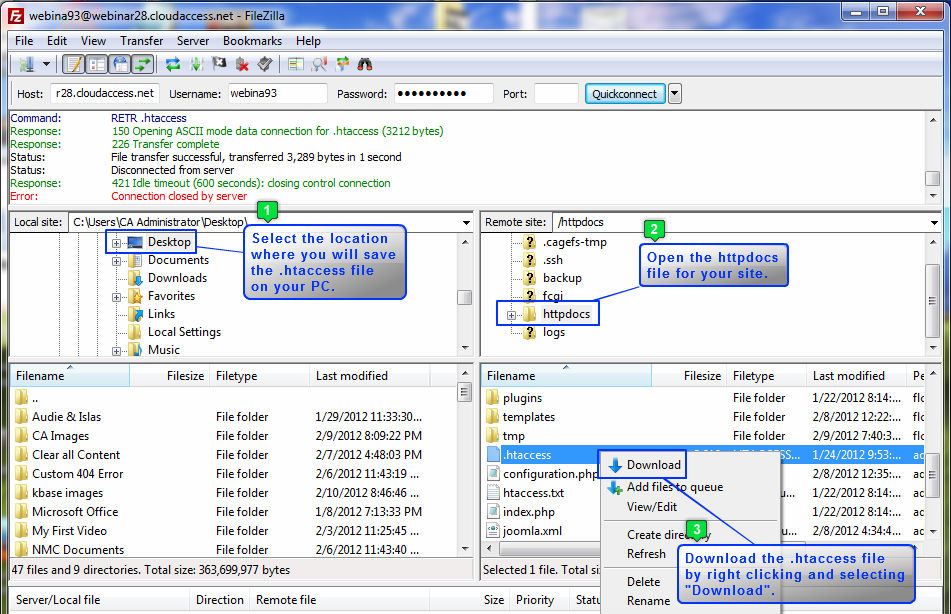
The next step is to log into your site using an FTP client. There are related resource links at the bottom of this article for additional guidance accessing and using FTP. Once you ve logged into your site using an FTP client, open the httpdocs file. You should select the area where you want to save the document on your PC so you can make some changes. Once the htaccess file is a root item in the httpdocs folder. Find it, right click on the file name, and select the "Download" option from the menu that appears. The file will appear where you saved it to your computer.
index3
Find the file on your computer. We strongly suggest that you make a back up of the file (save it elsewhere on your computer). At this point, you will also need to rename the file htaccess if it current titled htaccess.txt. You ll have to open the file using a text editor. For the purposes of this article, we have opened the file using Notepad.  Once the file is open, find the line that reads "# RewriteBase /". Delete the "#" sign from this line. Save the file.
index4
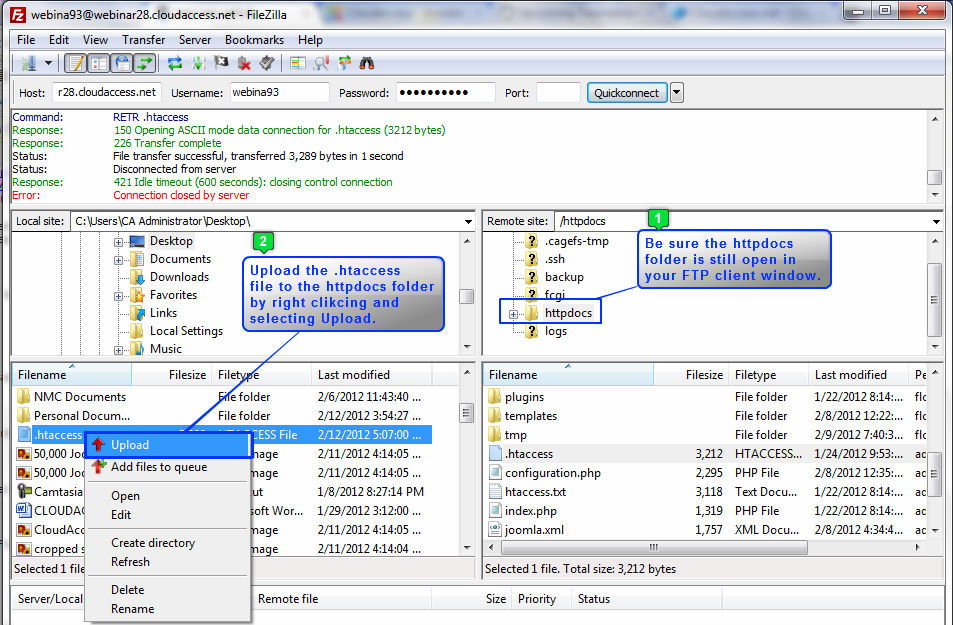
Return to your FTP client, and replace the file that you edited. Be sure the httpdocs folder is open using FTP, right click on the file name, and select the "Upload" option.
index5
You will have to approve the overwrite.
index6
Return to your site, and "index.php" should be removed from the URLs on your site.

    Blogger news

    Blogroll

    About