Monday, June 23, 2014

0 Comments
Posted in Arrangement, Art, Business

Using SSH on Windows (PuTTY)

Using a Public/Private key to authenticate when logging into SSH can provide added convenience or added security. The Public/Private key can be used in place of a password so that no username/password is required to connect to the server via SSH. Instead the unique public and private key provide the secure authentication. The keys may also be generated with a different password from your cpanel password if desired.


Generate a Public/Private Key Pair

  1. In cPanel click on the SSH/Shell Access icon under the Security category.

  2. SSL/TLS Manager

  3. Open the Manage SSH Keys tool.
  4. Click Generate a New Key and complete the fields shown. We recommend the RSA key type and a 4096 bit key size for maximum security. 
    Note: There is bug in cPanel at this time that does not allow you to create a 2048 or 4096 bit DSA key
  5. The location of the newly generated public and private key will be shown as well as the key fingerprint.
  6. Click Go Back.
  7. Next to the Public Key you generated, click Manage Authorization then click Authorize to activate this public key.
  8. Click Go Back.
  9. To the right of the Private Key, click on View/Download. Then click the Download Key button. Save the file to your computer and click go back.
You may now use the private key saved on your computer to SSH securely to our server. If you are using PuTTY, please see the configuration steps below.

Generate a ppk file

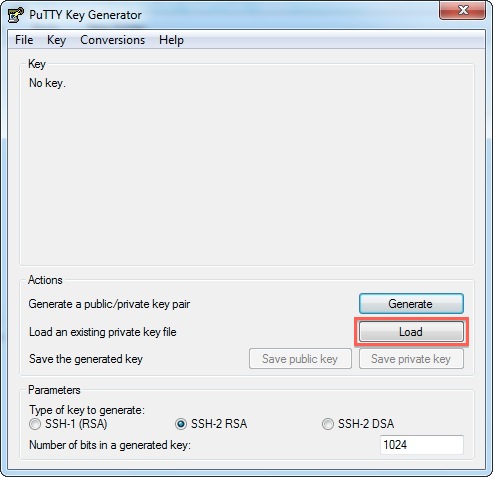
  1. Download and open PuTTYgen from the PuTTY Download Page
  2. Click Load

  3. Load Your Private Key

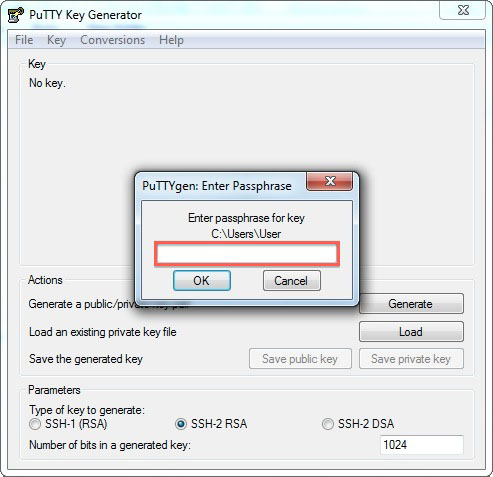
  4. Locate the private SSH key that you have downloaded.
  5. Note: You will need choose to display All Files* from the menu to the right of the File Name field.
  6. Enter the password for your SSH Key

  7. Enter the Passhrase for your SSH key

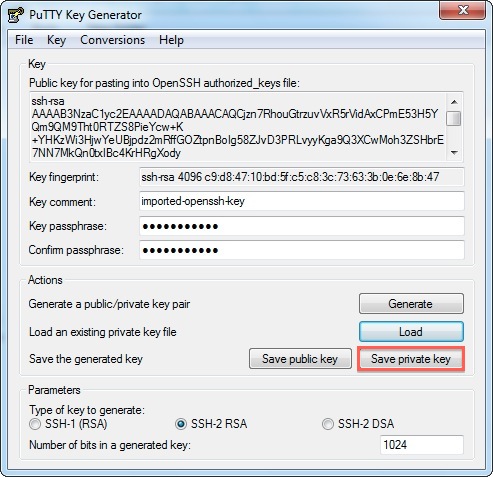
  8. Click the Save private key button to create the ppk file.

  9. Save the PPk file

Configuring PuTTY

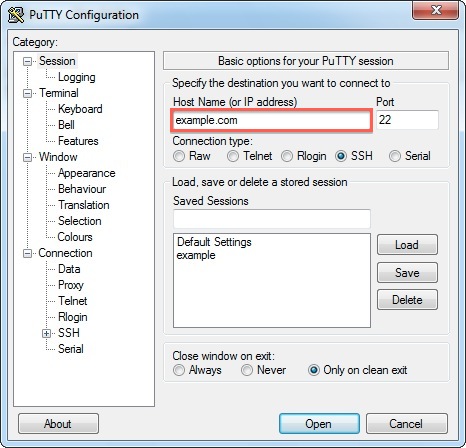
  1. In PuTTY, under Session, enter your Host Name

  2. Enter your Domain Name or IP Address

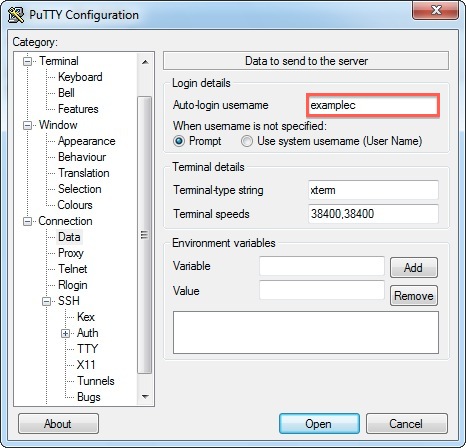
  3. Under Connection choose Data
  4. Enter your cPanel username as the Auto-login username

  5. Enter your cPanel username

  6. Under SSH, choose 2 from Preferred SSH Protocol Version
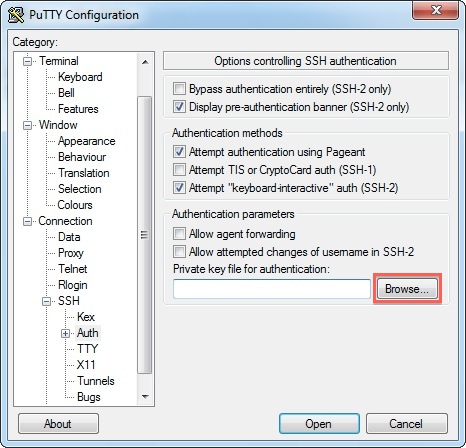
  7. Under SSH -> Auth, you will need to specify where your private key can be found. Remember this is where you saved the private key on your local computer. Click Browse to locate the file on your computer.

  8. Click Browse to locate your ppk file

  9. Under Sessions, type a name (such as "my site") in the Saved Sessions box and click Save.

Tuesday, June 17, 2014

0 Comments
Posted in Arrangement, Art, Business

Turn off Autodiscover for Outlook

Moved a client from an onsite Exchange server to a cloud cased Exchange server ( Office 365 ) and had the constant problem of Outlook ignoring what I had set as the server address and instead looking for the Local Exchange server.

In the end the good folks at Office365 pointed me toward a registry hack to stop Outlook from ignoring what I had set… thanks MS…
Open regedit and go here;
  • HKEY_CURRENT_USER\Software\Microsoft\Office\12.0/14.0 \Outlook\AutoDiscover
Then create a DWORD called ExcludeScpLookup and give it the value of 1.
Yes, you’re right, if you give it a value of 0 it turns it off again. Great if you’re in the midst of going back and forth to grab data/settings/etc.

Thursday, June 12, 2014

0 Comments
Posted in Arrangement, Art, Business

How to Reset PrestaShop Admin password

Using the Lost password link to reset your PrestaShop password

The Lost password link is the easiest way to reset your PrestaShop password. When you submit your admin email address, PrestaShop will automatically generate a new password and email it to you.
  1. Begin by navigating to your PrestaShop admin log in page.
  2. Under the Log in button, click the Lost password link.
    presta-lost-password
  3. On the next page, enter in your PrestaShop admin email address and click theSend button.
    presta-lost-password-email-address
  4. After you see the notification that your password has been sent, check your email account for an email with your new PrestaShop admin password.
    presta-lost-password-email-sent
    presta-email-new-password
  5. Log back into the PrestaShop Admin Dashboard using the newly received password.
If you would like to change the password to one of your choosing, this can be done within the PrestaShop back office. We suggest that you use the Adminstrator to create a new strong password. For guidance, check out our article on How to create a good password. For step-by-step instructions, please see our tutorial on changing your password in the PrestaShop back office.

Resetting your PrestaShop Password Through the Database

There may be times when you either do not receive the password reset email or PrestaShop has trouble sending the email. Fortunately, there is an alternative for changing the admin password through the PrestaShop database using a _COOKIE_KEY_ from the PrestaShop settings file. The _COOKIE_KEY_ is unique for each PrestaShop installation, so it will need to be retrieved from your PrestaShop files and you cannot use the one shown in this example or one from another PrestaShop store.
  1. Begin by logging into your cPanel account.
  2. Before we access the database, we need the _COOKIE_KEY_ from our PrestaShop config/settings.inc.php file. Using the cPanel File Manager, navigate to the folder where you installed PrestaShop (either public_html or a subdirectory of public_html).
  3. Next, navigate into the config folder inside of this directory where PrestaShop is installed.
    presta-config-folder
  4. Select the settings.inc.php file and open it with the Code Editor or Edit option in File Manager. If an Encoding Check notification pops up, just simply click on the Edit button at the bottom of the window.
    presta-edit-settings-inc-file
  5. Inside the settings.inc.php file copy the entire string of characters between the single quotes for the _COOKIE_KEY value. You may find it helpful to paste this into a text editor file (using a text editor like Notepad, TextEdit) while you are working through the rest of the steps.
    presta-copy-cookie-key
  6. Close the settings.inc.php file and the File Manager tab.
  7. Back on the cPanel home page, select the phpMyAdmin icon under theDatabases area. 
    phpmyadmin-icon-cpanel
  8. In phpMyAdmin, select your PrestaShop database name from the menu on the left side of the page.
    presta-password-database
  9. Inside your PrestaShop database scroll down the table names shown in the left menu and select the ps_employee table (prefix may vary if you changed this during the PrestaShop installation).
    presta-employee-table
  10. Click the edit link for your PrestaShop admin user
    presta-edit-user-in-database
  11. In the passwd value field paste in the _COOKIE_KEY value you copied earlier from settings.inc.php, followed by your new password. Do not use the example "NewPassword" shown below. This is only used as a placeholder in this tutorial to show you where to place your new password.
    presta-database-new-password
  12. In the Function column, select MD5 from the drop down menu
    presta-database-password-md5
  13. Click the Go button near the bottom of the page.
    presta-database-password-go
You've successfully reset your admin password. You can now log into your PrestaShop back office with the new password.

    Blogger news

    Blogroll

    About