Monday, April 28, 2014

0 Comments
Posted in Arrangement, Art, Business

How to manually set Password Protected Directory in cPanel

The system usually requires two files -- the .htaccess file and .htpasswd file.

The .htaccess Code

AuthType Basic
AuthName "restricted area"
AuthUserFile /home/cPanel_username/public_html/protect-me-dir/.htpasswd
require valid-user
The above code protects a directory called "protect-me-dir" at root level. The "AuthUserFile" value is always specific to your hosting configuration. If you don't know what the value should be, do aphpinfo() and find the DOCUMENT_ROOT value.

The .htpasswd Code

davidwalsh:daWHfZrDLB88.
rodstewart:roFulYxC2.8ws
cssexpert:csmnmq.M8T5ho
The .htpasswd file contains the usernames and passwords of allowed users. One per line. The passwords are MD5'd for security purposes.
You will need to create this file in home/cPanel_user/.htpasswds directory
To generate encrypted passwords for your .htpasswd file, you can use the following generator: http://www.htaccesstools.com/htpasswd-generator/

Tuesday, April 22, 2014

0 Comments
Posted in Arrangement, Art, Business

Redirect an Old Domain to your New Website

How to instructions using a 301 redirect and mod_rewrite

Simply enter the following code into your .htaccess file (changing the addresses in the examples below as needed) and save the changes. If there are several individual pages which have moved, just repeat as neccesary. Not sure how to access or change or .htaccess file. Read our .htaccess guide here.


Method 1:

Options +FollowSymlinks
RewriteEngine On
RewriteCond %{HTTP_HOST} ^olddomain.com [NC]
RewriteRule ^(.*)$ http://newdomain.com/$1 [L,R=301]

RewriteCond %{HTTP_HOST} ^www.olddomain.com [NC]
RewriteRule ^(.*)$ http://newdomain.com/$1 [L,R=301]


Method 2:

Options +FollowSymlinks
RewriteEngine On
RewriteCond %{HTTP_HOST} \olddomain.com$
RewriteRule ^(.*)$ http://newdomain.com/$1 [R=301,L]

Method 3:

Options +FollowSymLinks
RewriteEngine on
RewriteRule (.*) http://www.newdomain.com/$1 [R=301,L]

Method 4:

Redirect 301 / http://www.newdomain.com/

Monday, April 21, 2014

0 Comments
Posted in Arrangement, Art, Business

syntax or protocol errors (last command was "RCPT TO: <'email@domain.com'>,

Sometimes when you send an email to a familiar address that you've used before, it can be rejected because of an apparent header syntax error.  For example, the bounce notification message may include a diagnostic like this:
Delivery has failed to these recipients or groups:

'a.n.other@example.com' (a.n.other@example.com) A problem occurred during the delivery of this message to this e-mail address.
Your message header syntax is not valid, please check sender and recipient 550 addresses.
If you read further down the message you should see the original headers showing the incorrectly-formatted addresses in the To: header.
An email address (in a message header) should show the recipient's real name first, (possibly enclosed in quotes) followed after a space by the actual email address in angle brackets. You can also omit the real name altogether, for example just give the actual email address by itself. There must not be any quote marks surrounding the email address. Below are shown examples of correctly-formatted email addresses (all the examples use example.com but you can imagine them as sussex.ac.uk):
Examples of correct email addresses
Here are some examples of incorrectly-formatted email address, as they may appear in the diagnostics given with rejected messages:
Examples of incorrect email addresses
There may be several reasons for the incorrect address formatting.  It may be due to an incorrect address entry in your Contacts.  More likely, it's been changed by the Exchange system.
Exchange doesn't create its own Internet mail headers: instead, it has a gateway that translates Internet headers to Exchange headers, and vice versa. An indication of this is a series of semi-colons separating the recipients:  internet headers always use commas to separate email addresses.
Also, in the apparent email headers, what you see is a list of what Exchange thinks are the recipient's names. For external recipients (that is, those outside the Sussex Exchange mail system), there is often no real name attached to their email address, but Exchange software has populated what should be the "name" part with the email address. Sometimes, it seems, this happens even when there is already a name. And, sometimes it seems to happen more than once.
What we should see, is a To: header formatted like this:
Syntax of a To: internet mail header
So, the address is put in angled brackets alongside the name. The name is optional, and if omitted, then the angled brackets can also be omitted. Complicated names can be put in double quotes, as shown above.
WHAT YOU CAN DO
When you set up addresses in an Outlook contact group or distribution list, you need to make sure that onlythe person's real name is given in the Real Name box, and only their email address is given in the Email Address box. Don't enclose either in quote marks of any kind.
When composing a new message, follow the instructions below for the version of Outlook you are using:
Outlook 2010:
  1. When you've entered the address in your To: box in Outlook 2010, click in one of the other boxes and then the To: box again until the address in the To: box appears underlined:

    Outlook 2010: entered address

    Then double-click on the address.
  2. A dialogue box should appear:

    Outlook 2010: address properties dialogue

    Click on the address properties icon as shown in the image above.
  3. Click on Outlook Properties in the drop-down menu:

    Outlook 2010 address properties
  4. In the E-Mail Properties box, replace the address in the Display name box with a name:

    BEFORE
    Outlook 2010: address properties

    AFTER
    Outlook 2010 address properties

    Then click OK.
  5. You should now see the correctly-formatted email address in the To: box of your message:

    Outlook 2010 correct address format
Outlook 2007:
  1. When you've entered the address in your To: box in Outlook 2007, click in one of the other boxes and then the To: box again until the address in the To: box appears underlined.  Then double-click on the address:

    Outlook 2007 entered address
  2. When the Email properties dialogue box appears, clear the email address from the Display Name box and replace it with the person's real name such as Ann Other:

    BEFORE
    Outlook 2007 address properties

    AFTER
    Outlook 2007 address properties
  3. Ensure that the Email Type box is set to SMTP (click on the Internet type button and choose SMTP if necessary).
  4. Click OK.
  5. Then complete your email and send it in the normal way.

Friday, April 4, 2014

0 Comments
Posted in Arrangement, Art, Business

Configuring SMTP settings in Moodle


  1. smtp-setup-plugin-1-selectNavigate to Site administration > Plugins > Message outputs >Email in the settings section. 
  2. smtp-setup-plugin-2-smtpOn the Email page, configure the SMTP settings. By default Moodle will use the PHP mail function to send emails. If the administrator wants the email to go to a specific SMTP server, Like Gmail or Yahoo, the SMTP configuration settings can be adjusted to allow a different server to be used.
    In this tutorial, a Gmail email address will be used for the SMTP settings. The following fields will need to be configured for the mail to work. Below is an example of a generic Gmail SMTP set up.
    SMTP hosts: smtp.gmail.com:465
    (The port number must be attached to the Server host name for the port to be used. The standard configuration for the port will follow the hostname:port# format.)
    SMTP security: SSL
    (This setting will vary on the email servers SMTP setting requirements. For Gmail, SSL is required for the connection.)
    SMTP username: (The full email address for the username)
    SMTP password: Password for the email address.
    Below is a table with the settings for configuring the email messaging.

    Messaging output / Email
    SMTP hostsThe SMTP host is the server the email address connects to. For example, on our servers, the SMTP host will look something like the following:
    mail.yourdomaincom (None)
    secure##.inmotionhosting.com (SSL)
    SMTP securitySMTP security will either encrypt the out going email data or not. The SSL setting must match the same type of connection that was used for the SMTP Host name.
    SMTP usernameThis will be the full email address for the email account. Most email service providers require the entire email address for the username.
    SMTP passwordThis is the password for the specific email address that is being set up.
    SMTP session limitThis setting can prevent spam coming from the same session on the server. Limiting to 1 will require a new session to be created in order for an email to be set.
    No-reply addressThe no reply address is what displays in the return email address. This prevents the email address from being replied to by the recipient.
    Character setAllows the Character set to be changed to UTF-8, EUC-JP, GB18030, GB2312, ISO-2022-JP, ISO-8859-1, or SHIFT-JIS.
    Allow user to select character setEnables the users to be able to change the Character set.
    Newline characters in mailThis sets the type of character used for Newline characters.

    Once the fields have the correct Email information in them, click Save changes. Now messages sent through Moodle will deliver to the Gmail server as an authenticated user.

Thursday, April 3, 2014

0 Comments
Posted in Arrangement, Art, Business

How to Edit HOSTS file with Administrator permissions

Need to figure out how to edit the Hosts file in Windows 7? For the most part, it’s pretty much the same as Windows XP and Vista, but with a few extra hiccups!
Just if case you don’t know, the Hosts file is where you can manually enter a hostname and an IP address pair, thereby bypassing the DNS server. This can be pretty useful in certain situation, especially for anyone in IT.
The path to the Hosts file in Windows 7 is the same as usual:
%systemroot%\system32\drivers\etc\
where %systemroot% is usually c:\windows unless you installed Windows on a different partition. By default, you cannot see these hidden folders since they are system folders.
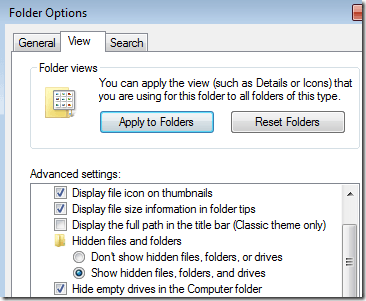
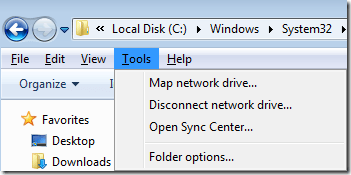
To show hidden folders in Windows 7, press the ALT key while in Explorer to bring up the File menu. Click on Tools and then Folder Options.
hosts file windows 7
Click on the View tab and then click on the Show hidden files, folders, and drives radio button under Hidden files and folders.
show hidden files windows 7
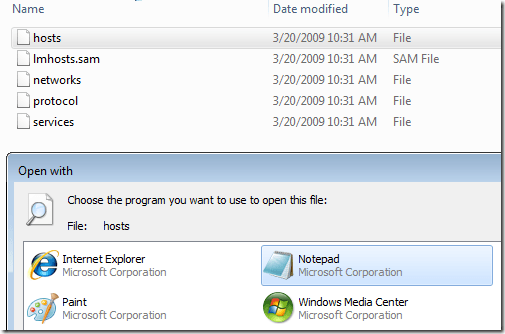
Now navigate to the directory above and open the hosts file and make your changes.
edit hosts file
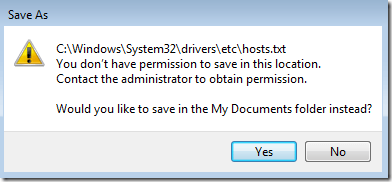
Note that this method for editing the Hosts file will not work. You will get a message saying you do not have permission to save in this location.
windows 7 hosts file
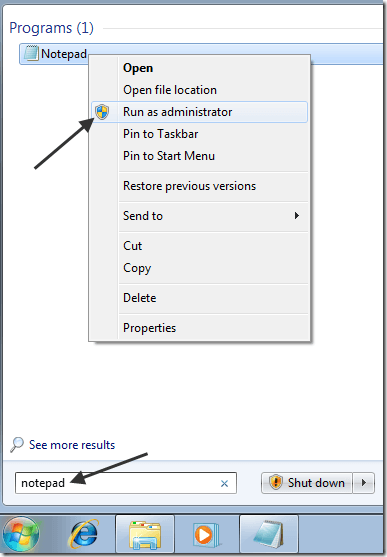
In order to edit it, you have to click on Start, type in Notepad and then right-click on Notepad and choose Run as Administrator.
run as administrator
Now navigate to the drivers/etc folder again and make sure to choose All files for File Types otherwise you won’t see the Hosts file.
view all files
Make your changes to the Hosts file and click File and Save to save all changes. Now you will not get the error about not being able to modify the Hosts file. Enjoy!
    Blogger news

    Blogroll

    About